Cling Film isn’t just useful to retain dampness in paint trays, it is also a creative tool for painting with. The paint pools along the edges of the wrinkles and folds, creating patterning that can be very effective in a painting. It is most often used with watercolour or fluid acrylics.
Clik here to view.
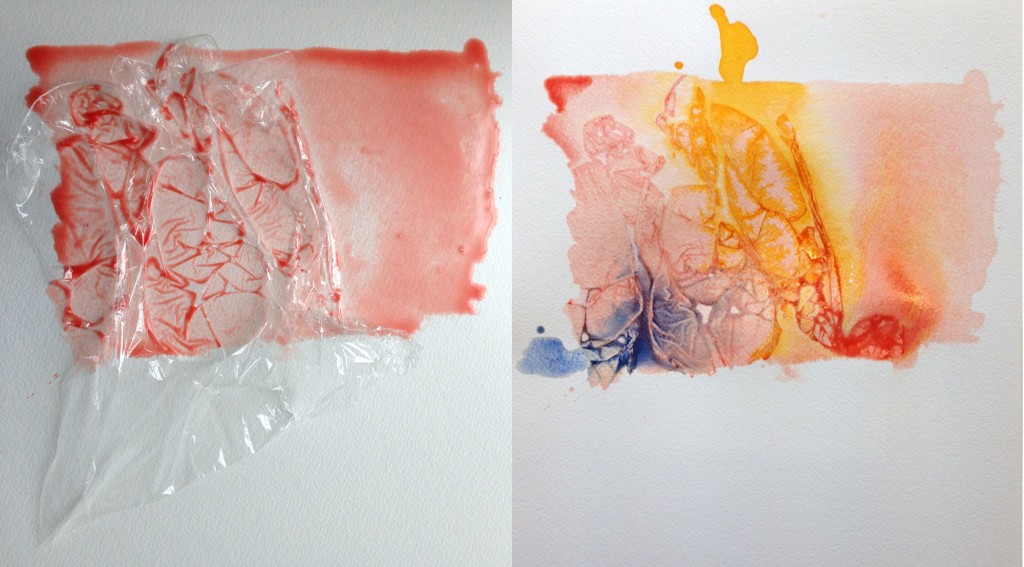
Laying ordinary cling film onto a wash of colour and peeling it off after it is dry creates a pattern.
Here I started with a wash of red, laid the cling film on, then poured yellow and blue to flow under the cling film to mingle with the wet red. Tilting the paper allows you to control how the colour runs and pools. The cling film was peeled off the next day after the paint had dried. -Julie
Click image for larger view.
Artist Chris Court, winner of the Horadam Watercolour Painting Competition, shows us how she uses cling film in her watercolour painting and how you can experiment with it in yours.
Experimenting with Cling Film Food Wrap
by Chris Court
These are experiments which show how one can create different effects and textures in watercolour with cling film or food wrap.
Having discovered Ann Blockley’s books ‘Watercolour Textures’ and ‘Experimental Landscapes in Watercolour’ I couldn’t wait to give it a go and have been having fun ever since. I also have the DVD’s which always inspire me to keep going.
Watercolours used:
Daniel Smith: Quinacridone Gold, Opera Pink, Perylene Green, Green Gold, Rose of Ultramarine
Winsor & Newton: Burnt Sienna, Cobalt Turquoise Light, Permanent Rose, Winsor Red
Schmincke Horadam: Cadmium Yellow Light
Jacksons’s: Phthalocyanine Blue, Ultramarine Blue, Naples Yellow
Paper used:
Arches: Not 140lb
Saunders Waterford: Not 140lb
Experimenting
I always start with the optimism that these experiments will turn into a finished painting, but in reality it is just to try out different colours and see what happens. It is a fun way to learn about the paint you have, when it is dry you can keep these experiments with notes on colour and paint reactions and have a visual copy of something you may use at a later date.
These photographs are experiments I have done in the past; my favourite subject is Dartmoor and the different moods of the moor.
Clik here to view.

Moor Tors
Watercolour
by Chris Court
Clik here to view.

Moody Moor
Watercolour
by Chris Court
For ‘plant textures’ I used Cobalt Turquoise Light, Phthalo Blue and Green Gold and sprinkled sea salt onto this before putting cling film over the top. When I took the cling film off it wasn’t quite dry and as I washed the salt off it took most of the colour with it, but I still quite liked the effect. This experimenting is totally unpredictable but great fun.
Clik here to view.

plant textures
Watercolour
by Chris Court
Landscape Experiment
I mixed Phthalo Blue and Permanent Rose for a light sky wash and then darkened it with the Phthalo Blue for the distant hills, darkened it again with both colours for the foreground. I placed the cling film on the foreground.
Using the cling film:
Put a large amount of paint (I used Ultramarine Blue) in a small bottle with a nozzle and add water to create a milky consistency. Squirt paint under the cling film from the bottom of the painting and if it isn’t flowing then squirt a bit of water under the cling film to make it move or water down the paint. This tends to fill the bits where the cling film is not touching the paper, it will bleed into areas that are touching, it depends on how much water you add.
When the cling film is on the painting, the areas that touch remain dark and the areas that don’t touch remain light, if you squirt paint under the cling film some of this paint travels into the areas that are not touching, this can create dark lines.
Tip the painting at an angle or move it around so the flow of paint and water are more interesting, leave to dry, preferably overnight. Once dry, peel off the cling film and see what you can save from this experiment, I liked the texture and colour in a part of the painting so cut this out and saved it with colour notes.
Clik here to view.

Landscape experiment
Clik here to view.

Interesting effects
Flowers
I had a quick sketch of some poppies and grasses, so used this to do some experimenting.
Clik here to view.

Pencil sketch
by Chris Court
I painted some poppy flower shapes using Winsor Red and Cadmium Yellow Light, I then put cling film on them to give the petals a crumpled look. I used Ultramarine for the sky and mixed Ultramarine and Cadmium Yellow Light for the greens and also added some Perylene Green. Choose your own favourite colours or anything you have to hand.
I put cling film over the green area stretching it so it could be interpreted as stems. I also used rubber tipped shapers to manipulate the cling film into a shape I liked. As in the landscape experiment, I used the bottle of milky consistency paint to squirt paint from the bottle under the cling film from the bottom of the painting, adding water as needed to make it flow. In addition to the water you could add Granulation Medium to add more interest.
Once it was dry I peeled off the paper to discover the shapes created. You could now work on this, lifting paint off, adding more shapes etc. I was pleased with the undergrowth texture so kept this for future reference, the poppies were discarded.
Clik here to view.

Poppies Step 1
Clik here to view.

Poppies Step 2
Clik here to view.

Poppies final result
Remember that you are experimenting and having fun
I prefer to leave everything to dry overnight, as I have had many disasters where I was too impatient and lifted the cling film before the paint was fully dry and then lost the sharp shapes it had created.
If you think that the paint you have applied is too heavy looking, try and judge when some of the paint is still damp, remove some of the cling film and carefully wash some of the paint away. Remember you are experimenting and having fun, you may get a masterpiece, but on the other hand…!
I keep the experiments to remind me of what worked and what didn’t and often play with different colours to see how they react together under cling film.
These are other effects that I cut out of earlier experiments:
Clik here to view.

I love these colours
Watercolour
by Chris Court
Clik here to view.

Rock Formations
Watercolour
by Chris Court
Finished Watercolour Paintings
Occasionally I am pleased with the results and have a finished painting. Here are just four examples:
Clik here to view.

Hawthorn Corner
Watercolour
by Chris Court
Clik here to view.

Purple Night
Watercolour
by Chris Court
Clik here to view.

River Winding
Watercolour
by Chris Court
Clik here to view.

Moorland Hawthorns
Watercolour
by Chris Court
A good way to learn about your colours
I find this more interesting than just making colour charts, it is a fun way to learn about the paints you love to use, which colours work, which ones granulate, colours you can lift and colours that stain.
Give it a try it is fun!
The post Cling Film Watercolour Technique appeared first on Jackson's Art Blog.